If you are looking for a very powerful server without costs, Oracle Cloud would be the right choice for you!

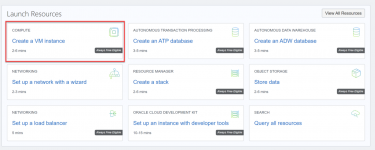
fig 1. Create a VM instance on Oracle Cloud
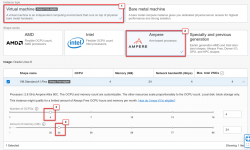
After login into your account, click on “Create a VM instance” as fig 1. According to Oracle [1], all tenancies get the first 3,000 OCPU hours and 18,000 GB hours per month for free for VM instances using the VM.Standard.A1.Flex shape, which has an Arm processor. For Always Free tenancies, this is equivalent to 4 OCPUs and 24 GB of memory. So, to get most of the “Always Free” service, you may follow the Shape setting as follow:

fig 2. Create a VM instance on Oracle Cloud
For the SSH option, you may create yourself using PuTTy or use the auto-generated one from Oracle, dont forget to save the SSH key as you need it to remote to your server.
For the Boot Volume, you may input 200 GB as it is the highest possible you can use as an Always Free tier:

fig 3. Create a VM instance on Oracle Cloud (Specify Boot Volume Size)

What can you do with it?
- Host WordPress website
- NodeJS/ Express Application
- Flask Application
- Run Docker Application
- Host Your Own Jupyter (24/7)
- Run Trading Bot, let it make money for you
- and many more …
Setup Oracle Cloud Server
Step 1: Create an account
Just head to
You must be registered for see links
and finish the registration process. Although you need to input your credit card, it is just for verification and you dont need to pay anything when using Always Free services.Step 2: Create VM

fig 1. Create a VM instance on Oracle Cloud
After login into your account, click on “Create a VM instance” as fig 1. According to Oracle [1], all tenancies get the first 3,000 OCPU hours and 18,000 GB hours per month for free for VM instances using the VM.Standard.A1.Flex shape, which has an Arm processor. For Always Free tenancies, this is equivalent to 4 OCPUs and 24 GB of memory. So, to get most of the “Always Free” service, you may follow the Shape setting as follow:

fig 2. Create a VM instance on Oracle Cloud
For the SSH option, you may create yourself using PuTTy or use the auto-generated one from Oracle, dont forget to save the SSH key as you need it to remote to your server.
For the Boot Volume, you may input 200 GB as it is the highest possible you can use as an Always Free tier:

fig 3. Create a VM instance on Oracle Cloud (Specify Boot Volume Size)
Step 3: Connect to VM
You may connect to your VM by SSH with the private key you generated from the last step with user “opc”. You may use PuTTy/ MobaXTerm/ OpenSSH in Windows or use Terminal in Mac/Linux to SSH to the server. After you are in, you may try sudo -i; yum update -y; to update all software on your machine.
That’s it! Now, the server is all yours!
Reference:
[1] Oracle Cloud Infrastructure Documentation (
You must be registered for see links
)